Hi Team,

I'm following the guide at https://dfo-pacific-science.github.io/data-stewardship-unit/how_to_guides/databricks_r_studio.html and I'd like to be added to the DFO Azure Databricks workspace (EDH Subscription) to access the DFO Pacific Lakehouse for my work which is [briefly describe your work here so that the administrators know which types of permissions to give you: Data Analyst, Data Scientist, Data Engineer (described in section 1.1 of https://dfo-pacific-science.github.io/data-stewardship-unit/how_to_guides/databricks_r_studio.html)]. Connect to the Azure Lakehouse from R
TL;DR
DFO’s shift to the Azure Lakehouse model integrates Azure Databricks, Data Lake Storage, Delta Lake, and Synapse Analytics, replacing siloed data storage and scattered code repositories. This transition centralizes data, standardizes workflows, and improves access to shared datasets and intermediate data products.
With Personal Access Tokens (PATs), analysts can now connect directly to the Lakehouse from RStudio (or other IDEs like VSCode or PyCharm), working seamlessly with cloud-stored data in their preferred environment. This guide explains how to set up that connection using RStudio for analysis, GitHub for code management, and the Lakehouse for data storage and sharing.
Azure Data Bricks and the Azure Lakehouse
Azure Databricks is a cloud-based analytics platform for big data processing, machine learning, and collaborative analysis. Built on Apache Spark, it integrates with Azure Data Lake Storage (ADLS), Delta Lake, and Synapse Analytics, the core components of the Azure Lakehouse.
In this model, Databricks acts as the compute engine, running code while Data Lake Storage and Delta Lake handle scalable, secure data storage. Synapse Analytics adds SQL-based analytics and data warehousing.
For DFO, adopting the Lakehouse model eliminates siloed data storage and fragmented code management. Previously, datasets were scattered across systems, and essential data cleaning and analysis code was split across multiple GitHub repositories, making it hard to track, reuse, or standardize. Valuable intermediate data products were often inaccessible. The Lakehouse consolidates data, transformations, and curated datasets, improving collaboration, reproducibility, and transparency.
Now, analysts can connect directly to the Lakehouse from RStudio (or any IDE) using PATs, gaining seamless, secure access to centralized data with scalable compute. This shift removes past limitations on data access, permissions, and technology use, significantly enhancing DFO’s analytical capabilities.
This guide walks through the setup process, enabling you to connect to Azure Databricks and analyze Lakehouse-stored data using RStudio for code execution, GitHub for version control, and the Lakehouse for data storage and sharing.
Quick Start Guide to Accessing Azure Lakehouse from R Studio
Access Token
Create your user access token in Databricks WebUI.
IMPORTANT: Treat this token as your personal password and do not share with anybody
- Request an account on the DFO Azure Databricks workspace (EDH Subscription) by submitting an email to DFO.PACStrategicData-DonneesStrategiquesPAC.MPO@dfo-mpo.gc.ca Copy, Paste this template request and replace the [placeholders] with your information:
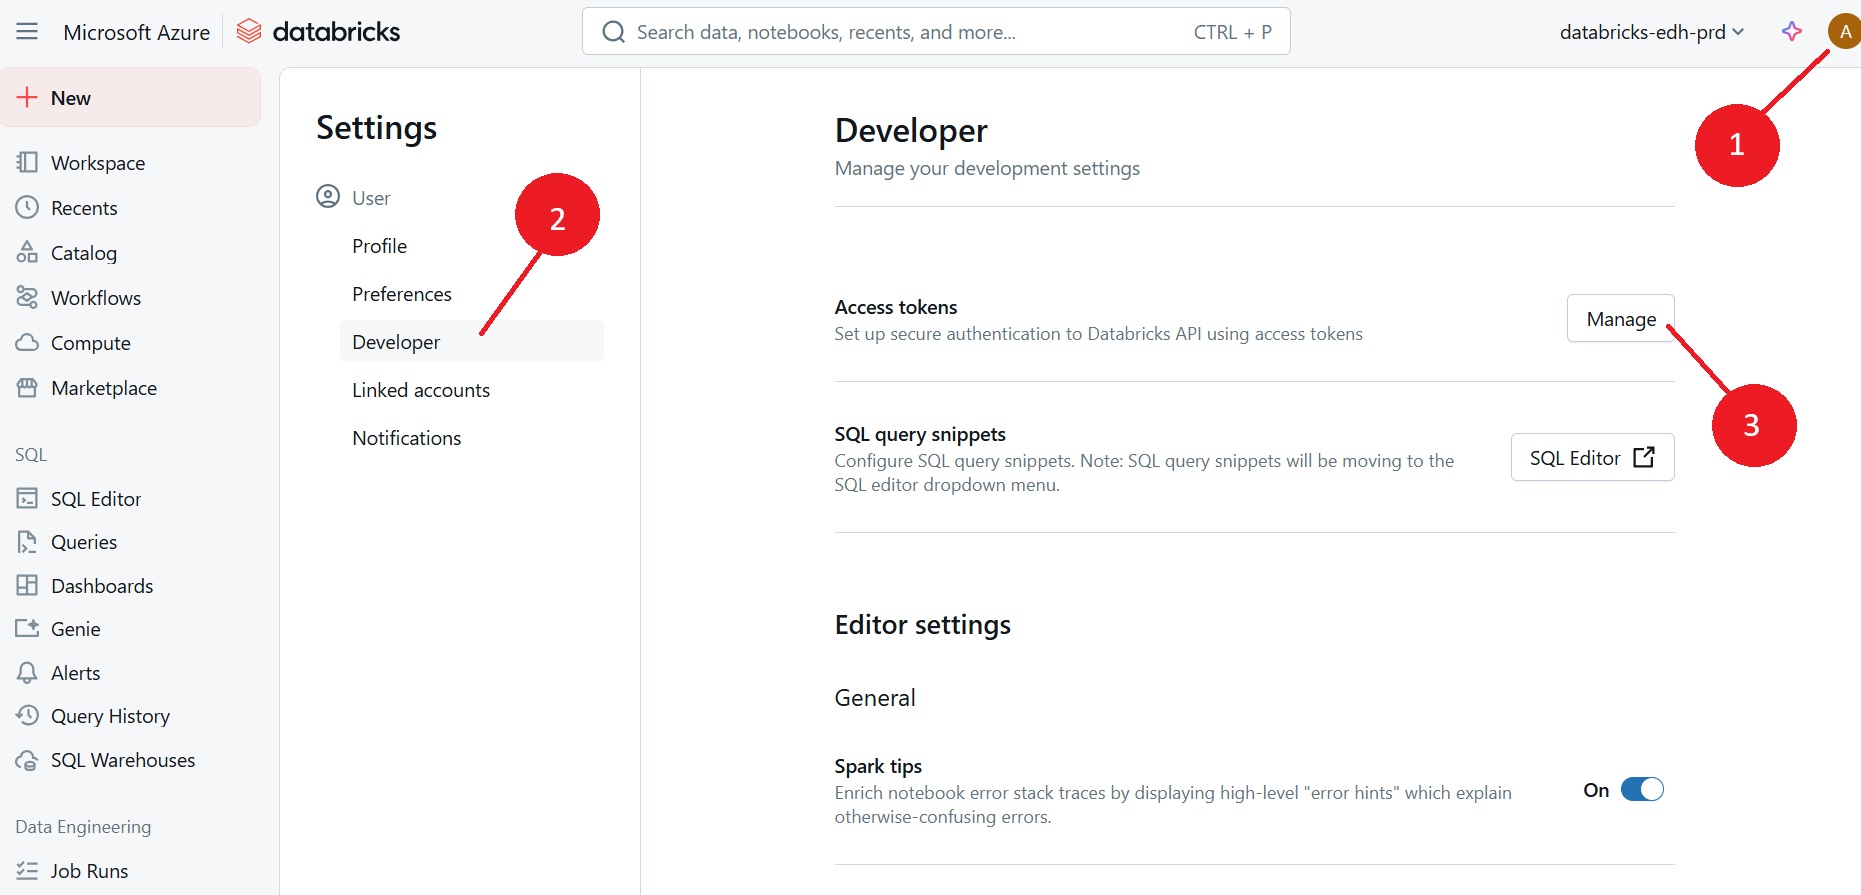
In Databricks Web UI > go to your profile page and navigate to
User > Developer
Access tokens > Manage
Generate new token as required. Ensure to set the expiration of the token to a suitable date (1 year from now)
Copy and save this token somewhere safe such as an encrypted password manager
JDBC Driver
Download
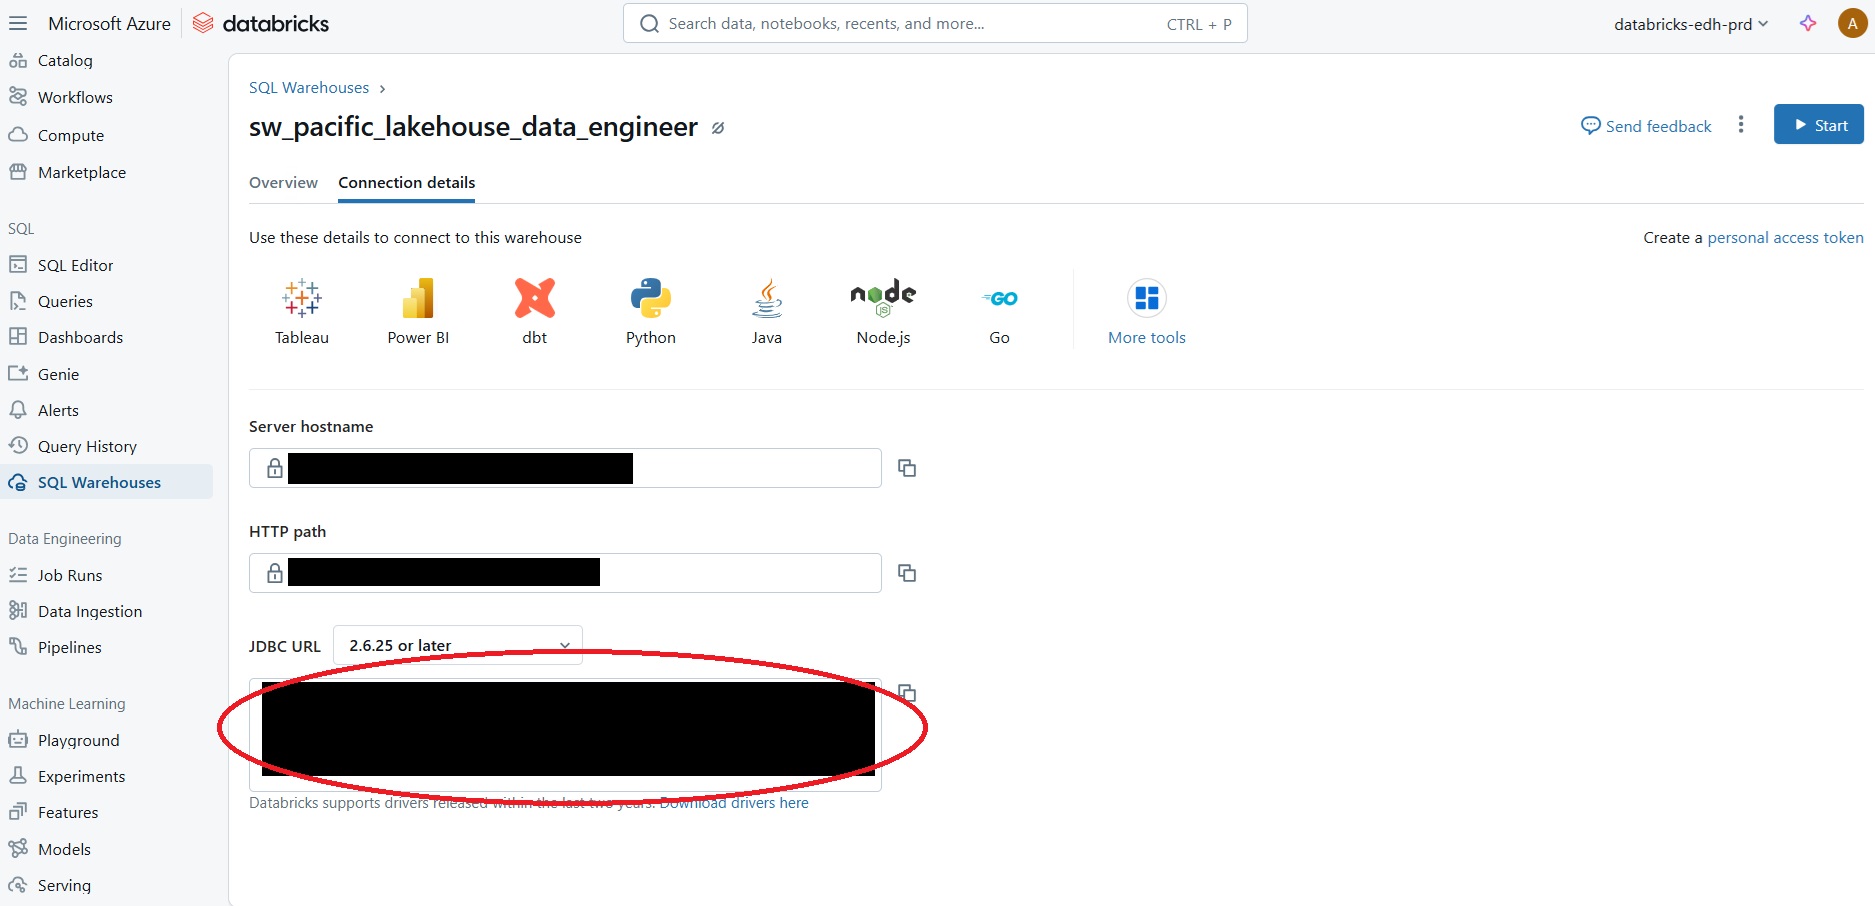
JDBC(java database connectivity) driver from https://www.databricks.com/spark/jdbc-drivers-download. Save and extract the .jar file to an accessible location on your computer (C:Users\Your usernameis fine).Set up your Databricks JDBC connection URL. You can copy this directly from Databricks this way
In the Databricks Web UI, navigate to SQL Warehouses
Click on the SQL Warehouse compute resource that you started
Go to ‘Connection details’ > JDBC URL and copy the string
Establishing a Connection to Databricks from R Studio (or any other IDE)
- Ensure you are on the DFO VPN
library(RJDBC)

jdbc_driver <- JDBC("com.databricks.client.jdbc.Driver", "C:/Users/JOHNSONBRE/DatabricksJDBC42.jar", "")

urlsql <- "jdbc:databricks://adb....;"

# Run the code below here once to store your personal access token in your R Environment.
# IMPORTANT! Never hard code your PAT in directly in your code script since your script will likely be shared, exposing your secret personal access token

file.edit("~/.Renviron") # add DATABRICKS_PAT="your_personal_access_token" to your .Renviron file

pat <- Sys.getenv("DATABRICKS_PAT")

connsql <- RJDBC::dbConnect(jdbc_driver, urlsql, "token", pat)
Test your connection to Databricks by running the following code:
dbGetQuery(connsql, "SELECT 1")If you see a table with a single row and a single column with the value 1, then your connection is successful
Exploring the Lakehouse
Next, we will query the available catalogs of databases, their schemas, and their tables in the Lakehouse.
Catalogs
Explore the available catalogs in the Databricks environment. Catalogs are the top-level containers in Databricks that store databases.
In the DFO Pacific Lakehouse, catalogs are used to organize the medallion architecture.
You may be able to see multiple catalogs in your Databricks environment.
# See what catalogs are available
dbGetQuery(connsql, "SHOW CATALOGS")
Schemas
Check available schemas in bronze catalogue
dbGetQuery(connsql, "SHOW SCHEMAS IN bronze_pacific_prod")

# check available schemas in bronze nuseds
dbGetQuery(connsql, "SHOW TABLES IN bronze_pacific_prod.nuseds_v2_0")

# Query bronze nuseds_v2_0 table
nuseds_activity_types <- dbGetQuery(connsql, "SELECT * FROM bronze_pacific_prod.nuseds_v2_0.activity_types LIMIT 10")
Tables
Check out the tables in FOS_v1_1
dbGetQuery(connsql, "SHOW TABLES IN bronze_pacific_prod.FOS_v1_1")Describe Tables
Describe a FOS_v1_1 table to extract metadata about a specific table, like what columns are available and their data types.
dbGetQuery(connsql, "DESCRIBE bronze_pacific_prod.FOS_v1_1.stock")Running Queries
Run a query to extract data from a table in the Lakehouse.
# Query bronze nuseds_v2_0 smu_cu_lookup table
smu_cu_lookup <- dbGetQuery(connsql, "SELECT * FROM bronze_pacific_prod.nuseds_v2_0.smu_cu_lookup LIMIT 10")

smu_cu_lookup
Connect to the FOS data and aggregrate:
# Query bronze FOS_v1_1 stock table
stock <- dbGetQuery(connsql, "SELECT * FROM bronze_pacific_prod.FOS_v1_1.stock")
Try using an aggregation function such as count and group by to get a count of the number of rows in the table.
# Count the number of rows in the stock table
dbGetQuery(connsql, "SELECT COUNT(*) FROM bronze_pacific_prod.FOS_v1_1.stock")
Local Compute versus Databricks Compute
Using Databricks compute should be minimized to avoid unnecessary costs. Instead, use your local computer for data exploration and analysis. Only use Databricks compute when you need to access new data, write data back to the Lakehouse, or run large-scale computations.
When Databricks Compute is Used vs. Local Compute
Databricks Compute:
- Running SQL queries and data processing tasks on the data stored in the Azure Lakehouse.
- Any operations that involve querying the data, such as dbGetQuery(connsql, “SELECT * FROM …”), are executed on Databricks compute resources.
Local Compute:
- Writing and executing R scripts that establish the connection to Databricks.
- Processing the results returned from Databricks.
- Managing code with Git and GitHub from your local machine.
Tips to Minimize Databricks Compute Costs
Optimize Queries: Write efficient SQL queries to minimize the amount of data processed and transferred to your local machine.
Use Caching: Save data locally and don’t run dbGetQuery commands unless you are intentionally trying to get new data. Cache intermediate results when performing complex transformations to avoid redundant computations.
For example in R:
# Query the data and save it to a variable
data <- dbGetQuery(connsql, "SELECT * FROM ...") # Run the query only once or as needed for new data

# Perform transformations on the data
transformed_data <- data %>% ...

# Cache the transformed data
saveRDS(transformed_data, "transformed_data.rds")

# Next time you need the transformed data, don't run the query again, instead load it from the cache or from your local copy

# Load the transformed data from the cache
transformed_data <- readRDS("transformed_data.rds")

# Continue working with the transformed data
Using GitHub with R Studio, Azure DataBricks and Lakehouse
If you’re primarily using RStudio with JDBC to connect to the Lakehouse to access and store data, doing most of your work locally, and storing your code on GitHub, you don’t need to integrate GitHub with Databricks directly. Instead, your workflow will revolve around local development, cloud data access, and GitHub for version control.
If you don’t have Git installed, a GitHub account, and have the two communicating using R Studio, follow the steps in this excellent guide by Jenny Bryan: Happy Git and GitHub for the useR.
Assuming you’ve got Git and GitHub set up, here’s how to structure your workflow efficiently:
Local Development: Write and test your code in RStudio on your local machine. Use RStudio to establish a JDBC connection to the Lakehouse and run queries on the data stored there.
Data Access: Use Databricks compute resources only when necessary, such as when you need to access new data, write data back to the Lakehouse, or run large-scale computations. Minimize Databricks compute usage to avoid unnecessary costs.
GitHub for Version Control: Store your code in a GitHub repositories in
dfo-pacific-scienceto manage versions, track changes, and collaborate with others. Use Git to push and pull code between your local machine and GitHub.Code Management: Keep your code organized and well-documented. Use R Markdown files to create reproducible reports that combine code, results, and narrative text. Use GitHub to track changes and manage code versions and releases.
Data Management: Use the Lakehouse to store and share data. Use Azure Data Lake Storage and Delta Lake to manage large datasets, intermediate data products, and curated datasets. Use Databricks to process and analyze data at scale.
Collaboration: Share your code and results with colleagues using GitHub repositories. Use GitHub issues and pull requests to discuss changes, review code, and merge contributions. Use GitHub Actions to automate testing, linting, and deployment tasks.
Documentation: Write clear, concise documentation for your code, data, and analysis. Use README files, code comments, and R Markdown reports to explain your work, assumptions, and results. Use GitHub Wiki pages to create detailed documentation for your projects.
Reproducibility: Make your code reproducible by using version control, package management, and containerization. Use RStudio projects to manage dependencies and environments. Use Docker containers to create reproducible computing environments.
By following these best practices, you can streamline your workflow, improve collaboration, and enhance the reproducibility of your work. You can leverage the power of Azure DataBricks and the Lakehouse model to access, analyze, and share data efficiently, while using GitHub to manage code versions, track changes, and collaborate with others.
Using a GitHub Repo in Databricks
One of the advantages of using GitHub with Databricks is that you can easily import code from a GitHub repository into a Databricks notebook. This allows you to leverage the version control and collaboration features of GitHub while working in Databricks.
However, there are a few things to keep in mind when using a GitHub repo in Databricks:
Importing Code: You can import code from a GitHub repository into a Databricks notebook by specifying the URL of the GitHub repository. Databricks will clone the repository and import the code into the notebook.
Code Execution: When you import code from a GitHub repository into a Databricks notebook, the code is executed in the Databricks environment. This means that any data access or processing tasks will be performed on Databricks compute resources.
Code Management: While you can import code from a GitHub repository into a Databricks notebook, you are not able to push code changes back to the repository directly from Databricks. If you need to make changes to the code, you will need to do so in the GitHub repository and then re-import the code into the Databricks notebook.